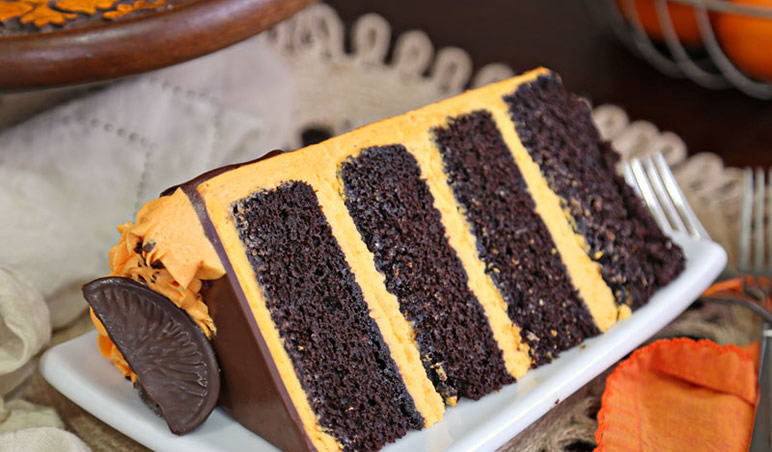
This Chocolate Orange Cake is the perfect blend of citrus flavors and dark chocolate. It features four layers of chocolate cake filled with tangy orange buttercream, topped with a shiny chocolate glaze and chocolate orange slices.
For the Chocolate Cake:
- 3 cups water
- 4.5 oz unsweetened cocoa powder, (1 ½ cups)
- 18 oz all-purpose flour, (4 cups)
- 1 TBSP baking soda
- ¾ tsp baking powder
- 1 ½ tsp salt
- 12 oz unsalted butter, at room temperature
- 26 oz granulated sugar, (3 ¾ cups)
- 6 large eggs, at room temperature
- 2 TBSP vanilla extract
For the Buttercream:
- 1 oz unsweetened chocolate, finely chopped
- 6 fl oz pasteurized liquid egg whites, (3/4 cup, see Note below)
- 24 oz powdered sugar, (6 cups)
- 1/2 tsp salt
- 24 oz unsalted butter, (6 sticks), at room temperature
- 2 TBSP vanilla extract
- Orange gel food coloring
- 1 tsp orange oil, or 2 tsp orange extract
- Zest of 2 oranges
- ¼ tsp citric acid, optional
To Assemble:
- 5 fl oz orange juice, (2/3 cup)
- 4.6 oz granulated sugar, (2/3 cup)
- 4 oz semi-sweet chocolate, finely chopped
- 6 fl oz heavy cream
- Chocolate sprinkles
- Chocolate orange slices, or other decorations, optional
Instructions : To Make the Chocolate Cake:
- Preheat the oven to 350 F. Line four 8-inch cake pans with sides at least 2” high with parchment rounds, and spray the insides with nonstick cooking spray.
- Pour the water into a medium bowl and microwave until it starts to boil, 3-4 minutes. Add the cocoa powder and whisk well, until all of the dry cocoa dissolves. Cover the bowl with plastic wrap to prevent water from evaporating, and let it sit until the paste is warm but not burning hot.
- In a large bowl, sift together the flour, baking soda, baking powder, and salt, and set aside.
- Combine the butter and sugar in the bowl of a mixer fitted with a paddle attachment, and beat on medium speed for 8-10 minutes, until very light and fluffy. Add the eggs two at a time, beating for about a minute between each addition, then mix in the vanilla.
- Alternate adding the dry ingredients and the cocoa mmixture in batches, beginning and ending with the dry ingredients. Finish by scraping the bottom and sides of the bowl with a rubber spatula to mix the cake batter well.
- Divide the batter between the prepared pans—if you have a kitchen scale, each pan should get about 22-23 oz of batter. Bake at 350 F for 55-60 minutes, until the cakes spring back when lightly pressed with a fingertip and a toothpick inserted into the center comes out with just a few moist crumbs attached.
- Cool the cakes completely before using them. They can be made in advance and kept, well-wrapped, in the refrigerator for a week or in the freezer for several weeks. Allow them to partially defrost before assembling.
To Make the Buttercream:
- Place the unsweetened chocolate in a small bowl and microwave for 30 seconds. Stir, and microwave in smaller increments if necessary until melted and smooth. Set aside until the melted chocolate is no longer hot.
- Meanwhile, combine the whites, powdered sugar, and salt in the bowl of a large stand mixer fitted with a paddle attachment. Mix everything together on low speed, until the sugar is moistened and no dry patches remain. Turn off the mixer, scrape down the sides and bottom of the bowl with a spatula, then turn the mixer to medium speed. Beat on medium for 5 minutes.
- After 5 minutes, turn the mixer to medium-low and start adding the softened room temperature butter, 1-2 tablespoons at a time. Once all of the butter is incorporated, add the vanilla extract and mix it in. Stop the mixer and scrape down the bottom and sides once more. Turn the speed to medium and beat the buttercream for 10 minutes. At the end, you’ll have a frosting with a wonderfully light and creamy texture.
- Separate out approximately 1/2 cup of frosting, and mix the melted chocolate into the frosting to make a deep, rich chocolate color.
- To the rest of the frosting, add several drops of orange gel food coloring, the orange zest, the orange oil or extract, and the citric acid (if using). Mix well, and adjust the color and flavoring until you’re satisfied.
- At this point, the frostings can be used right away, or transferred to an airtight container. If you’ll be using them within a day they can be left out on the counter, or stored in the refrigerator for up to 2 weeks. If you have chilled the frosting, let it come to room temperature COMPLETELY and then beat it for several minutes to smooth it out and restore its texture before using it.
To Assemble and Decorate:
- Combine the orange juice and granulated sugar in a small saucepan over medium heat. Stir frequently while the mixture heats up and comes to a simmer. Once simmering, remove it from the heat and allow it to cool to room temperature.
- Place the cake rounds on 8-inch cardboard cake circles. Place one layer on a cake turntable. Take a pastry brush, and generously brush the top of the chocolate cake with the orange syrup.
- Place a big dollop of orange frosting on the cake layer—about 1 generous cup—and use a metal spatula to spread the frosting into an even layer going all the way out to the edges of the cake.
- Top the cake round with a second cake layer, and repeat the syrup and frosting process again. Do it with a third layer, and finally, add the last cake layer. Brush the top of the cake with the orange syrup, then cover the top and sides of the cake with a very thin layer of frosting—this is the crumb coat, which locks crumbs into the frosting and also provides some stability to the cake. Refrigerate the cake for 45-60 minutes, until the crumb coat is set and the cake feels firm and stable.
- If the orange buttercream has started to get spongy, re-whip it briefly until it is smooth and silky. Cover the top and sides of the chilled cake with a thicker layer of frosting. Use a bench scraper or metal spatula to smooth out the sides and top of the cake as much as possible. Chill for 30-45 minutes, until firm.
- Take a small metal spatula and dab the chocolate buttercream in small spots all around the sides of the cake. Use a bench scraper or large metal spatula to smooth out the buttercream and create a smooth surface with subtle chocolate streaks. (You can add more orange frosting or chocolate frosting until you get an effect you love.)
- Combine the chopped semi-sweet chocolate and the cream in a medium bowl, and microwave for 1 minute. Whisk well, and if any chunks of chocolate remain, whisk again briefly until it is completely melted and smooth. The chocolate glaze should have a fairly thin texture, and if you dip a spoon in and let excess drip out, it should almost immediately blend back into the glaze in the bowl.
- Transfer the chocolate to a squeeze bottle with a narrow tip. Squeeze a dime-sized amount of glaze along the top edge of the cake, and nudge it gently so it starts to slide down the side. Repeat right next to the first drip, and continue around all the edges of the cake. Squeeze the remaining glaze into the center of the cake, and use a small spatula to smooth it into an even layer that joins with the outer ring. Let the glaze set for 10 minutes in the refrigerator, or about minutes at room temperature, so that it’s not completely soft and liquid when adding the decorations on top.
- Transfer the remaining orange buttercream to a piping bag fitted with a large star tip, and pipe frosting rosettes all along the edges of the cake. Top the rosettes with chocolate sprinkles, chocolate orange slices, or any other decorations you’d like.
- For the best taste and texture, serve this cake at room temperature. Leftovers keep well, and can be stored in an airtight container in the refrigerator for up to a week, but will taste best when eaten within 3-4 days.
Recipe Notes
This recipe calls for pasteurized egg whites. It is safe to consume egg whites without cooking them, as long as you make sure that the whites you buy are pasteurized. To save time, I buy them in a carton–look for 100% egg whites, not liquid egg substitute. If you cannot find them in a carton, you can buy pasteurized eggs and separate them yourself. You’ll need about 5-6 large eggs to get the ¾ cup called for in the recipe.
Measuring Tips
Our recipes are developed using weight measurements, and we highly recommend using a kitchen scale for baking whenever possible. However, if you prefer to use cups, volume measurements are provided as well. PLEASE NOTE: the adage “8 oz = 1 cup” is NOT true when speaking about weight, so don’t be concerned if the measurements don’t fit this formula.

